

Ideas & Guides
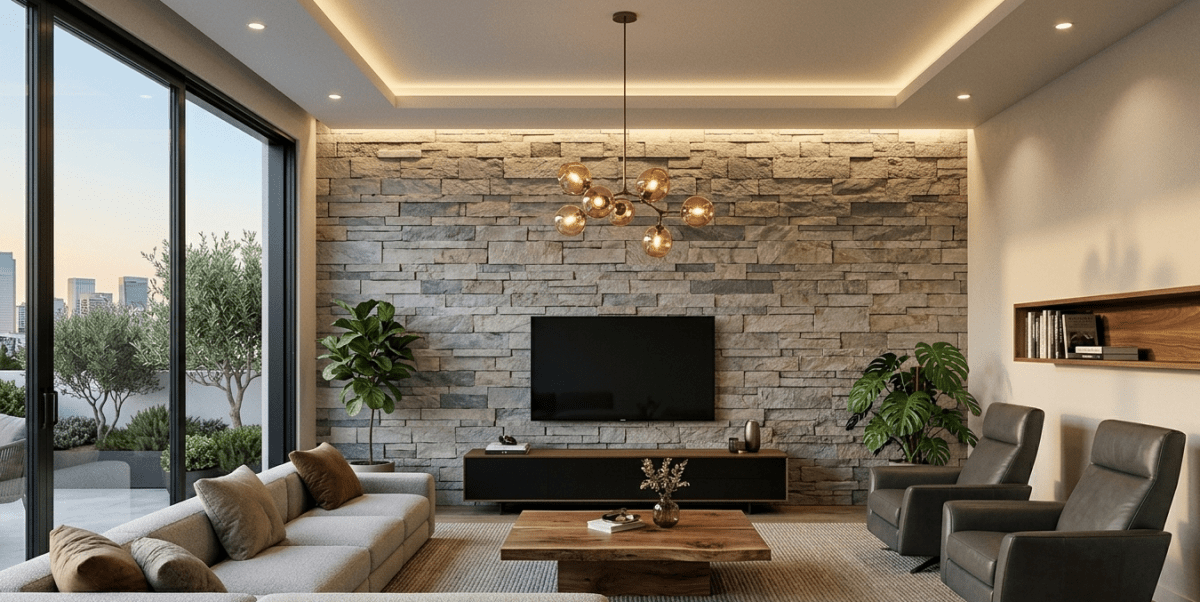

Marble Wall Panels Australia: How to Get the Luxury Look Without the Cost
Marble has always been the material of luxury in interior design. From the great public buildings of ancient Rome to the resort hotels of the Whitsundays, marble signals quality, permanence, and considered taste. But traditional slab marble comes with a set of practical challenges that put it out of reach for many Australian renovation projects. Marble wall panels change that equation completely. At Sketch, we stock over 20 marble wall panel designs in thin stone veneer format. These are genuine natural marble, not porcelain prints or engineered composites. This guide explains exactly how marble panels work, where they can go, and how to choose the right marble for your Australian home. What Are Marble Wall Panels? Marble wall panels from Sketch are thin stone veneer products made by slicing genuine natural marble to a thickness of 1 to 3 millimetres. The thin marble slice is bonded to a fibreglass mesh backing that holds it together and gives it flexibility. The result is a panel of real marble that weighs approximately 4 to 6 kilograms per square metre rather than the 60 to 80 kilograms that slab marble would weigh over the same area. This dramatic weight reduction means marble wall panels can go places that traditional marble cannot. Plasterboard walls, timber framed structures, and even curved surfaces become viable substrates. The installation process is similar to large format tile, rather than requiring specialist stone masonry. Why Choose Marble Wall Panels Over Traditional Slab Marble? Weight Slab marble requires significant structural consideration in most residential applications. Marble wall panels do not. This is the most important practical difference and it opens up a much wider range of installation options. Cost Slab marble requires precision cutting, specialist fixing, and experienced stonemasons for installation. Marble wall panels can be installed by a tiler or competent DIYer. The installed cost difference for a bathroom feature wall can be $3,000 to $8,000 depending on the size of the project. Flexibility Because thin marble veneer panels are slightly flexible, they can wrap around curved walls and columns. Traditional marble slab cannot flex without breaking. Speed A marble wall panel installation can be completed in one to two days for a typical bathroom or bedroom feature wall. Traditional marble installation of the same area would take three to five days. Where Can Marble Wall Panels Be Used in an Australian Home? Bathroom feature walls The bathroom is the most popular location for marble wall panels in Australian homes. A marble feature wall behind a freestanding bath or as the main wall of a shower creates the kind of resort bathroom that most Australian homeowners aspire to. With a waterproof membrane beneath, marble wall panels are fully suitable for wet area use. Kitchen splashback A marble splashback behind a cooktop or sink elevates a kitchen significantly. Marble panels cut cleanly to fit around outlets and fixtures. For cooking splashbacks, use a marble with dense veining rather than a very pale background if you are concerned about oil splatter staining over time, and seal the marble thoroughly. Living room feature wall A marble feature wall in a living room creates understated luxury. Soft grey or cream marble behind a sofa or fireplace is one of the most classically beautiful interior design choices available. Master bedroom headboard wall A marble headboard wall in the master bedroom is a growing trend in Australian interior design. The cool elegance of natural marble creates a striking backdrop for bedding and lighting. Marble Types Available at Sketch Our marble wall panel range covers a wide spectrum of natural marble varieties: White and cream Carrara style marble for classic, timeless interiors Grey marble with bold veining for contemporary spaces Black marble for dramatic, high contrast applications Green and teal marble for distinctive accent walls Warm gold and brown veined marble for luxurious, warm spaces How to Maintain Marble Wall Panels Natural marble requires some care to maintain its appearance. Seal all marble wall panels with a penetrating stone sealer before use and reapply annually. Clean with a pH neutral stone cleaner rather than generic bathroom cleaners, which can etch the marble surface over time. Wipe up acidic spills such as wine, lemon juice, or vinegar immediately. With appropriate care, marble wall panels maintain their appearance for the life of the installation. The natural variation in marble means that any minor marks or variations that develop over time actually add character rather than detracting from the appearance. Order Marble Wall Panel Samples from Sketch Marble looks different in different lighting conditions and next to different materials. We always recommend ordering samples before purchasing your full quantity. Sketch offers samples across our entire marble wall panel range with fast delivery to addresses across Australia.
Learn all
Feature Wall Ideas for Australian Living Rooms: 10 Inspiring Stone Looks
The living room feature wall is one of the highest impact design decisions you can make in an Australian home. A well executed feature wall transforms a room from a collection of furniture into a cohesive space with a genuine sense of character. Stone wall panels are particularly powerful in this role because they bring texture, depth, and a sense of permanence that paint and wallpaper cannot replicate. At Sketch, we have supplied stone veneer panels for living room feature walls in homes from Melbourne to Darwin. Here are ten looks that work consistently well in Australian interiors. 1. Full Height Slate Behind the Television The television wall is the most common location for a living room feature wall and full height slate panels are one of the best materials for this application. The strong vertical lines of split face slate draw the eye upward, making the room feel taller. Dark charcoal slate grounds the television within the wall rather than having it float on a painted surface. Pair with floating timber shelves and warm LED downlights for a complete look. 2. Marble Panel Feature Wall in a Coastal Home For homes close to the water, white or cream marble wall panels create a connection between the interior and the coastal landscape outside. The soft veining of natural marble has an organic quality that suits relaxed coastal living. A marble feature wall behind a sofa in a light filled room with linen furnishings and natural timber floors creates exactly the kind of relaxed luxury that Australian coastal living is known for. 3. Warm Sandstone in a Queensland or Northern Territory Home In tropical and subtropical Australian climates, warm sandstone panels bring the palette of the outdoor landscape into the living room. Honey and buff toned sandstone reads as calm and grounded in spaces flooded with natural light. This look is particularly strong with rattan and timber furniture, woven textiles, and abundant indoor plants. 4. Carbon Crystal Board Panels for a Home Theatre If your living room doubles as a home theatre, Carbon Crystal Boards are a material worth serious consideration. These translucent panels have a crystalline depth that creates atmosphere even without backlighting. With a dedicated LED backlight system behind the panels, the effect in a darkened room is genuinely dramatic. Sketch supplies Carbon Crystal Boards in a range of tones from deep black to translucent amber. 5. Fireplace Surround in Stacked Slate The fireplace has always been the traditional focal point of the living room and stacked slate panels are one of the most popular ways to give it presence. A full height slate surround from the mantle to the ceiling creates a strong vertical statement. The natural texture of slate handles the heat radiation from a fireplace without any risk of fading or discolouration over time. 6. Half Wall Panelling for a Period Home In older Australian homes, half wall panelling in stone is a way to acknowledge the architectural history of the space while bringing contemporary texture. Stone panels to 1.2 or 1.5 metres on the lower section of the wall, with a painted wall above, creates a clear visual line that works well in rooms with high ceilings. Slate in rust tones works particularly well in Federation or Victorian era homes. 7. Translucent Stone Panel Room Divider In open plan living spaces, a partial translucent stone panel divider allows light to flow between zones while creating visual separation. When backlit, translucent stone panels create a warm amber glow that adds atmosphere to an open plan space in the evening. This look is increasingly popular in contemporary Australian homes where open plan living is the norm but some spatial definition is still desired. 8. Textural Contrast With Smooth Furnishings One of the most effective uses of stone feature wall panels is as a textural contrast to smooth contemporary furnishings. A rough split face slate wall behind a sleek leather sofa, polished concrete floors, and minimalist joinery creates a tension between rough and smooth that gives the room energy and sophistication. The stone becomes the dominant material in the room and everything else plays a supporting role. 9. Entry Feature Wall That Carries Through to the Living Room Where the entry hall and living room are visible from each other, a stone feature wall that begins at the entry and continues into the living room creates a powerful sense of arrival and architectural continuity. This approach works best with a single stone type used consistently throughout, and it is one of the most effective ways to make a strong first impression when you open the front door. 10. Gallery Wall With Stone Background A stone feature wall does not have to carry the room on its own. Some of the most interesting living rooms use stone as the backdrop for an art or photography gallery wall. The texture of natural stone behind framed artwork creates a layered, curated look that is more interesting than hanging work on a painted wall. Lighter stone tones such as cream marble or buff sandstone work best as gallery wall backgrounds because they do not compete with the artwork. Choosing the Right Stone for Your Living Room The right stone for your living room depends on your existing palette, your furniture style, and the atmosphere you want to create. As a general guide, slate works in contemporary, industrial, and moody interiors. Marble suits coastal, luxe, and minimal spaces. Sandstone fits warm, organic, and Australian vernacular styles. Carbon Crystal Boards are the choice for dramatic, futuristic, or entertainment focused rooms. Order samples before you commit. Stone looks different in different light conditions and seeing the actual panel in your room is always better than making a decision from a screen.
Learn all
Outdoor Wall Cladding Australia: A Complete Guide to Stone Exterior Panels
Australian homes are built around outdoor living. The alfresco wall, the outdoor kitchen surround, the garden boundary wall, the pool pavilion facade. These surfaces take real punishment from the Australian climate and they are on display every time you step outside. Choosing the right outdoor wall cladding material matters enormously, both for how it performs over time and for how it looks. Stone is one of the best outdoor wall cladding materials available in Australia. It handles heat, UV, rain, and salt air better than most alternatives. This guide covers everything you need to know about choosing, specifying, and installing stone outdoor wall cladding for an Australian property. Why Stone Is One of the Best Outdoor Cladding Materials in Australia Australia's climate is tough on building materials. UV radiation at Australian latitudes degrades many products faster than comparable climates in Europe or North America. Temperature swings between winter and summer, particularly in inland areas, cause expansion and contraction that can stress finishes over time. Coastal properties deal with salt air corrosion that attacks metals, timbers, and synthetic materials. Natural stone handles all of these conditions well. It does not fade under UV exposure the way painted surfaces or composite materials can. It has very low thermal expansion relative to its mass. And it is chemically inert, meaning salt air has little effect on it. Properly installed stone outdoor wall cladding on an Australian home should last the life of the building with minimal maintenance. Best Stone Types for Outdoor Wall Cladding in Australia Slate Slate is the most popular choice for exterior stone wall cladding in Australia and for good reason. It is a dense, low porosity metamorphic rock that handles moisture exposure extremely well. Its natural cleavage planes create a textured, layered surface that conceals weathering and ageing well over time. Available in charcoal, rust, grey green, and multicolour varieties, slate suits both contemporary and traditional Australian architecture. Sandstone Sandstone is a quintessentially Australian material with deep roots in the country's building history. Its warm honey and buff tones complement the Australian landscape in a way that no imported material can replicate. For exterior applications, sandstone requires sealing to prevent moisture absorption and staining. Properly sealed, it is a highly durable outdoor cladding material that improves in character as it ages. Quartzite Quartzite is harder and denser than most stone types, with excellent resistance to weathering and abrasion. It is particularly well suited to high traffic exterior surfaces such as wall bases in outdoor living areas where chairs and furniture may make contact with the wall. Australian Climate Considerations UV and heat All natural stone handles UV exposure without fading. However, darker stone colours absorb more heat in direct summer sun. In very hot climates such as Darwin, Brisbane, or inland Western Australia, lighter stone tones are more comfortable in outdoor spaces where people sit close to the walls. Coastal environments Salt air has minimal effect on natural stone itself but can degrade some adhesive and sealant systems over time. For coastal properties, specify adhesive and grout products with explicit salt air or marine environment ratings. Sketch can advise on the right system for your location. Fire risk areas For properties in bushfire prone zones, the construction requirements are governed by AS 3959. Natural stone cladding is non combustible and performs well in BAL rated construction. The specific BAL rating that stone cladding can satisfy depends on the installation system and substrate. Always confirm compliance with your certifier before committing to a specification. Important for BAL rated areas: Non-combustible stone cladding panels can contribute to BAL compliance but the entire wall system including substrate, adhesive, and cavity must be assessed together. Ask Sketch for the relevant technical documentation for your build. Outdoor Wall Cladding Installation Considerations Exterior installations require more attention to the installation system than interior work because of exposure to moisture, thermal movement, and wind loading. Use an exterior rated flexible adhesive, not standard tile adhesive Grout all joints fully to prevent water ingress behind panels Apply a penetrating stone sealer to sandstone and lower porosity stones before first exposure to rain Allow for thermal movement joints every 3 to 4 metres in large exterior installations Ensure adequate drainage at the base of cladded walls so water does not pool against the stone Popular Outdoor Applications for Stone Wall Cladding Alfresco and outdoor entertaining areas The outdoor living wall behind a built in BBQ or outdoor kitchen is the most popular residential application for stone wall cladding in Australia. Stone handles heat from outdoor cooking and weathering from rain without any of the maintenance that timber or painted surfaces require. Pool walls and surrounds Stone cladding around pool walls and equipment enclosures creates a resort style aesthetic that ages beautifully. Use slate or quartzite in pool environments for their low porosity and resistance to pool chemicals. Garden and boundary walls A cladded garden wall in sandstone or slate instantly elevates the quality of an outdoor space. These walls take no direct structural load from the cladding and are straightforward to install with standard thin stone veneer panels. Building facades and feature panels Stone cladding on the exterior of a home is a significant design statement that adds real value to the property. Even a partial facade application, such as a stone panel feature at the entry or around the garage, makes a powerful architectural impression. Maintenance Requirements for Outdoor Stone Cladding Natural stone outdoor wall cladding requires very little ongoing maintenance compared to painted or coated surfaces. The main tasks are resealing every two to three years, particularly for sandstone, and cleaning with water and a stone safe cleaner to remove dirt and moss in shaded areas. Avoid pressure washing at high pressure directly onto the stone surface as this can erode grout joints over time. A medium pressure wash at appropriate distance is fine for general cleaning.
Learn all
Thin Stone Veneer vs Traditional Stone Cladding: Which Is Right for Your Australian Home?
If you want the look of natural stone on your walls, you have two very different ways to get there. Traditional stone cladding has been used in Australian construction for generations. Thin stone veneer is a newer category of product that has changed the equation significantly. Understanding the differences between them helps you choose the right option for your project, your budget, and your wall. What Is Traditional Stone Cladding? Traditional stone cladding refers to pieces of natural stone that are cut or split to a thickness of 20mm or more and applied to an existing wall structure. The stone is genuinely thick and heavy. Installation requires a solid masonry or rendered substrate, mechanical fixing in many commercial applications, and a skilled stonemason for larger projects. The weight per square metre is typically between 40 and 80 kilograms depending on the stone species and cut thickness. Traditional cladding has been used on Australian homes for decades, particularly in period homes, heritage restorations, and high end custom builds where the depth and shadow of thick stone is part of the design brief. What Is Thin Stone Veneer? Thin stone veneer panels are made by slicing natural stone to a thickness of 1 to 3 millimetres. This process uses precision cutting equipment rather than any synthetic or manufacturing process. The result is 100 percent genuine natural stone, with all the same colour variation, texture, and character as traditional stone, but at a fraction of the weight. The thin stone slice is bonded to a fibreglass mesh or flexible polymer backing that holds it together and makes it safe to handle, cut, and install. Sketch supplies thin stone veneer panels in slate, marble, sandstone, quartzite, and several specialty finishes including translucent stone. Weight Comparison Weight is the most significant practical difference between the two product types and it has enormous implications for what you can do with each. Traditional stone cladding at 20mm thickness weighs 40 to 80 kilograms per square metre. Standard residential wall structures are rarely designed to handle this load without engineering assessment, which adds cost and time to any project. Thin stone veneer panels typically weigh 3 to 8 kilograms per square metre. This is light enough to go directly onto standard plasterboard walls with no structural assessment required. It is also light enough for ceiling applications, furniture installation, and curved surfaces that would be impossible with traditional cladding. Installation Comparison Traditional stone cladding Requires a masonry or rendered substrate. Mechanical fixings are often needed for exterior or large scale applications. Professional installation is typically essential for anything beyond a small garden wall. Installation is slow, labour intensive, and costly. Thin stone veneer Installs directly onto plasterboard, concrete, masonry, or timber frame with flexible tile adhesive. No mechanical fixings required for most residential applications. Suitable for experienced DIY installation. Much faster than traditional cladding. Rule of thumb: A two person professional crew can install approximately 25 to 30 square metres of thin stone veneer per day. The same crew would manage 8 to 12 square metres of traditional stone cladding in the same time. Cost Comparison Material costs for thin stone veneer and traditional stone cladding can be similar per square metre for equivalent stone species. The significant cost difference comes from installation. Traditional stone cladding requires specialist labour and often structural engineering assessment. Thin stone veneer can be installed by a tiler or an experienced DIYer. For a typical 10 square metre feature wall in an Australian home, the total installed cost difference between the two approaches can be $2,000 to $5,000 in favour of thin stone veneer when you account for labour and substrate preparation. Aesthetics: Does Thin Stone Veneer Look as Good? This is the question most people ask and the honest answer is that the visual result is virtually identical in most applications. Because thin stone veneer is genuine natural stone with the same face texture, colour, and character as traditional cladding, the finished appearance is extremely similar. The depth of shadow in the joints can vary slightly depending on joint width, but a well installed thin stone veneer wall is indistinguishable from traditional cladding to most observers. The one area where traditional stone cladding has a genuine aesthetic advantage is in applications where the stone reveals significant thickness at an edge, such as a freestanding garden wall or a window sill where the stone section is visible. In these cases the depth of traditional stone is part of the design. For wall applications where only the face is visible, thin stone veneer delivers the same result. Durability and Longevity Both product types use genuine natural stone, which is one of the most durable materials available. The durability of either product in a wall application depends primarily on the installation quality and the choice of adhesive and grout system rather than the stone itself. Properly installed thin stone veneer panels with quality adhesive, grout, and sealer will last as long as a traditional stone cladding installation. Which Should You Choose? Choose traditional stone cladding if you need genuine stone depth visible at edges, if you are working on a heritage restoration where the original stone thickness matters, or if you are building a freestanding wall where the stone is structural or semi structural. Choose thin stone veneer if you are applying stone to a standard residential wall, if budget or timeline matters, if you want to DIY the project, or if your wall structure cannot take the weight of traditional cladding. For the vast majority of Australian residential and commercial interior applications, thin stone veneer is the smarter choice.
Learn all
How to Install Stone Veneer Wall Panels: A Step by Step Guide for Australian Homes
Stone veneer wall panels are one of the most rewarding DIY projects an Australian homeowner can take on. The result looks like a professional stone installation but the process is far more approachable than traditional masonry. Whether you are covering an internal feature wall, a fireplace surround, or an exterior alfresco wall, this guide walks you through every stage from preparation to the finished product. At Sketch we supply thin stone veneer panels to homeowners and trade professionals across Australia. The installation advice below is based on real experience with our products on Australian substrates and in Australian conditions. What You Need Before You Start Good preparation is the difference between a stone wall that looks perfect for twenty years and one that develops problems within twelve months. Before you touch a single panel, gather the following: Thin stone veneer panels from Sketch (order 10% extra for cuts and waste) Flexible tile adhesive rated for stone and the substrate you are working on Waterproof membrane if working in a wet area or bathroom Notched trowel (6mm or 8mm depending on panel thickness) Rubber mallet Angle grinder or diamond blade tile saw for cutting Spirit level Grout or pointing compound in a colour that suits your stone Stone sealer for finishing Safety glasses and dust mask for cutting Step 1: Prepare the Wall Surface The wall must be clean, flat, dry, and structurally sound before any stone veneer panels go up. Remove any paint that is peeling or flaking. Fill any cracks or dips in the surface with a suitable filler and allow it to cure fully. For plasterboard walls, ensure all screws are flush and the board is firmly fixed to the studs. Plasterboard is a perfectly suitable substrate for thin stone veneer panels because of their low weight compared to traditional stone cladding. For wet areas such as bathroom feature walls, apply a waterproof tanking membrane to the entire surface and allow it to cure before applying adhesive. This is not optional in any zone within 1.5 metres of a water source. Key point: Skipping surface preparation is the most common reason stone veneer installations fail. Spend the time here and every step after becomes easier. Step 2: Plan Your Layout Lay your panels out on the floor in front of the wall before applying any adhesive. This lets you plan your layout, check for colour variation across the batch, and work out where your cuts will fall. Start from the bottom and work up, keeping full panels at eye level wherever possible. The most visible part of the wall should have the least cuts. Mark a level horizontal line across the wall at your starting course height using a pencil and spirit level. Step 3: Mix and Apply the Adhesive Mix your flexible stone tile adhesive according to the manufacturer instructions. The adhesive should have a smooth, peanut butter consistency and should hold its shape when you press it without slumping. Apply adhesive to the wall using the flat side of your notched trowel, then comb it with the notched side to create uniform ridges. Work in sections of about half a square metre at a time so the adhesive does not skin over before you place the panels. Back butter each stone veneer panel with a thin skim of adhesive as well. This improves bond coverage, which is especially important on textured panel surfaces. Step 4: Place and Set Each Panel Press each panel firmly into the adhesive with a slight twisting motion to collapse the ridges and ensure full contact. Use a rubber mallet to tap the panel flat, checking with your spirit level as you go. Leave consistent joint gaps between panels using spacers if needed. Work from the bottom course upward, staggering the vertical joints between rows like brickwork. This creates a stronger visual result and a more stable installation. Step 5: Cut Panels for Edges and Corners Stone veneer panels cut cleanly with a diamond blade angle grinder or a wet tile saw. Always cut on the face side and wear safety glasses and a dust mask. For outside corners, mitre both panels at 45 degrees for a neat finish. For inside corners, one panel simply overlaps the other. Step 6: Allow Full Cure Before Grouting Allow the adhesive to cure fully before applying grout or pointing compound. This is typically 24 hours for interior applications and up to 48 hours for exterior or wet area projects. Check the adhesive manufacturer instructions for the specific product you are using. Step 7: Grout or Point the Joints Apply grout or pointing compound to fill the joints between panels. For natural stone, a matching or complementary tone usually looks best. Remove excess grout from the face of the stone with a damp sponge before it sets hard. Pro tip: For a natural stone look, slightly recess the grout joints so they sit just below the surface of the panels rather than flush with them. Step 8: Seal the Stone Apply a penetrating stone sealer to the entire installation once the grout has cured. This protects the stone from staining, reduces moisture absorption, and makes ongoing cleaning much easier. Reapply sealer every two to three years for exterior installations or whenever water stops beading on the surface. Common Installation Questions Can I install stone veneer panels myself? Yes. Sketch thin stone veneer panels are lightweight and designed to be installed by homeowners with basic DIY skills. The most important step is preparation. If the surface is right, the installation is straightforward. How long does installation take? An experienced installer can complete 10 to 15 square metres per day. For a first time installer, expect to cover 5 to 8 square metres per day for a feature wall project. Do I need a professional for wet areas? The tiling work itself is DIY friendly but we strongly recommend consulting a licensed builder or waterproofer for the membrane application in wet zones to ensure compliance with Australian building standards.
Learn all
Carbon Crystal Wall Panels: The Future of Interior Design in Australia
Every decade or so, a genuinely new material emerges in interior design — something that doesn't look like anything that came before it, that creates possibilities that simply weren't possible with earlier products. Carbon Crystal Boards (CCB) are that material for the 2020s. If you haven't encountered them yet, you're about to understand why designers and architects across Australia are talking about them. What Are Carbon Crystal Boards? Carbon Crystal Boards are an advanced composite panel material with a distinctive translucent or semi-translucent quality. When light passes through them — natural or artificial — they have an appearance often compared to gemstones, crystalline ice, or backlit resin art. Unlike stone, timber, or ceramic, CCB doesn't have a direct natural reference point. It looks like nothing else. The panels are manufactured through a process that creates a highly consistent internal crystalline structure. This structure is what gives CCB its extraordinary light-refracting qualities and its depth of colour. Available in a wide range of tones from deep blacks and charcoals through to soft milky whites, translucent ambers, and vibrant jewel tones, there's a Carbon Crystal Board to suit almost any design direction. What Makes Carbon Crystal Boards Different? Most wall panel materials are opaque — they sit on the wall and reflect light from their surface. CCB panels interact with light differently. Backlit CCB glows from within, creating a luminous quality that shifts as the ambient light in the room changes. During the day, a CCB panel reads one way. In the evening with backlighting activated, it becomes something entirely different. This dynamic relationship with light makes CCB ideal for applications where the wall is meant to be experienced, not just seen — bars, feature walls, room dividers, reception areas, and anywhere that needs to make a lasting impression. Designer's note: CCB looks completely different in daylight vs artificial light. When planning a CCB installation, always consider both lighting conditions. Backlighting is optional but dramatically changes the impact. Where Are Carbon Crystal Boards Used? Residential Feature Walls The most popular residential use is as a statement feature wall — in a living room behind the TV unit, in a home theatre, or as a dramatic headboard wall in a master bedroom. The reflective, luminous quality of CCB adds depth to any space and works particularly well in rooms with controlled or moody lighting. Bar and Hospitality Fit-outs CCB has become a favourite material in hospitality design because it photographs beautifully and creates an immediate atmosphere. A backlit CCB panel behind a bar or spirit display creates the kind of visual impact that brings customers back. Several high-profile Australian bar and restaurant fit-outs have used CCB as their signature material. Commercial Reception and Lobby Walls First impressions matter enormously in commercial spaces, and a Carbon Crystal Board feature wall in a reception area or building lobby delivers the kind of impact that stone or timber simply can't. CCB is increasingly specified by architects and interior designers for corporate, medical, and retail fit-outs. Room Dividers Semi-translucent CCB panels used as room dividers allow light to move between spaces while maintaining visual separation. This application works beautifully in open-plan homes and offices where hard walls feel too closed and glass feels too exposed. Furniture and Joinery Beyond walls, CCB is being used in custom joinery — cabinet fronts, shelving inserts, table tops, and built-in furniture. The material machines cleanly and can be cut and shaped to suit almost any application. Visit our gallery to vitness the magic. How Do Carbon Crystal Boards Install? CCB panels are typically installed using a proprietary adhesive system or mechanical fixing, depending on the application. For wall applications, the process is similar to installing large-format tiles — the substrate needs to be flat, clean, and dry, and the panels are bonded using a compatible adhesive. Joints can be left open for a panel look or filled with a colour-matched sealant. For backlit applications, the panels are typically installed on a frame with LED strip lighting behind them. The specific lighting setup depends on the translucency of the panel chosen and the intensity of glow desired. Are Carbon Crystal Boards Durable? CCB is a hardwearing, impact-resistant material suitable for both commercial and residential use. It's resistant to moisture and can be cleaned with standard non-abrasive cleaners. For high-traffic commercial applications, it's worth discussing the specific panel specification with our team to ensure the product matches the demands of the space. Where Can You Buy Carbon Crystal Boards in Australia? Sketch is one of the very few Australian suppliers of Carbon Crystal Boards. We stock a range of CCB panels in different colour families, translucencies, and finishes, available for homeowners, designers, and builders across Australia. Our team can provide samples, technical data sheets, and installation guidance. If you're working on a project that calls for something genuinely new and different, Carbon Crystal Boards deserve a serious look. Browse our CCB range or contact the Sketch team to discuss your project.
Learn all
Sandstone vs Slate Wall Panels: Which Is Right for Your Australian Home?
Two of the most popular stone wall panel choices for Australian homes are sandstone and slate. Both are natural stones. Both are available as thin veneer panels that can be applied to standard interior and exterior walls. But they look completely different, behave differently, and suit different spaces. If you're trying to choose between them, this guide will help you make the right call. The Look: What's the Visual Difference? Sandstone Sandstone has a warm, earthy quality that feels distinctly Australian. Its tones tend to run through buffs, honeys, cream, and terracotta — the colours of the Australian outback and the historic sandstone buildings of Sydney and Brisbane. The texture is typically smooth to gently granular, with a matte finish that absorbs light rather than reflecting it. In a home, sandstone wall panels create warmth and a sense of organic, natural comfort. They pair naturally with timber, rattan, linen, and other natural materials. They're the choice for spaces that feel grounded, relaxed, and connected to the landscape. Slate Slate is cooler, more dramatic, and more directional. Its natural cleavage planes create a layered, stratified texture that has strong visual depth. Slate tones run from deep charcoal and dark grey through to rust-red, green-grey, and multicolour varieties. The surface has a matte sheen and the layers catch light at different angles, creating a constantly shifting appearance as the light changes through the day. Slate wall panels suit contemporary, industrial, and moody interiors. They pair well with dark metals, polished concrete, and minimalist furnishings. They make a strong statement without trying too hard. Durability: How Do They Compare? Both sandstone and slate are natural stones that have been used in construction for centuries — so durability isn't really a question of one being weak. But they do have different characteristics worth understanding. Sandstone Sandstone is a sedimentary rock and is slightly more porous than slate. This means it benefits from sealing, particularly in exterior applications or areas that will be exposed to moisture. Unsealed sandstone can absorb water and, in high-exposure environments, may show staining over time. Properly sealed, it's a highly durable material that performs well outdoors in the Australian climate. Slate Slate is a metamorphic rock — it's been subjected to heat and pressure over millennia, making it denser and less porous than sandstone. It has natural water-resistant properties and is widely used in wet areas and exterior applications without sealing (though sealing is still recommended for best long-term performance). Slate is also slightly harder and more resistant to chipping and scratching than sandstone. Winner for wet areas: Slate has a natural advantage in bathrooms and exterior walls exposed to heavy rain. Sandstone is perfectly suitable with sealing, but slate requires less maintenance. Cost: Is One More Expensive? In the Australian market, sandstone and slate wall panels are generally in a similar price bracket when comparing equivalent panel types. Thin stone veneer panels in both materials typically range from $80–$150 per square metre, depending on the specific product and finish. Premium or specialty cuts of either stone can cost more. Sketch stocks a range of both sandstone and slate panels at various price points. We recommend requesting samples and comparing like-for-like before making a purchasing decision based on price alone. Best Uses: Where Does Each Shine? Choose Sandstone If You Want: Warmth and organic earthiness in your space A natural material that feels distinctly Australian A relaxed, resort-style outdoor entertaining area A feature wall in a living room or bedroom with warm-toned furniture A material that pairs well with timber and natural fibres Choose Slate If You Want: A dramatic, high-contrast feature wall A material that suits a contemporary or industrial interior A naturally water-resistant stone for bathrooms or exterior walls Depth and texture in a darker, moodier colour palette Flexibility for both interior and exterior applications with minimal maintenance Can You Use Both? Absolutely. Some of the most interesting interiors use two different stone types in the same space — sandstone on an exterior alfresco wall paired with slate in the adjacent indoor kitchen, for example. The contrast between the warm tones of sandstone and the cool drama of slate can be genuinely beautiful when handled thoughtfully. The key is to establish a clear logic to the choices — stone type follows the function of the space, or it follows the colour palette, not both at once. Order Samples and See for Yourself The best way to choose between sandstone and slate is to order samples of both and hold them up in your space. Natural stone changes dramatically in different lighting conditions — what looks cool and grey in the showroom can look quite different under warm downlights in your living room. Sketch makes sampling easy. Browse our range and order your samples online today.
Learn all
Wall Panelling for Bathrooms: Ideas and Everything You Need to Know
The bathroom might be the most underestimated room in the house when it comes to design. For most of us, it's the first room we enter every morning and the last one we leave at night — yet it often gets the least creative attention. Wall panelling is changing that. From natural stone feature walls to full marble surrounds, the right wall panelling can completely transform your bathroom from functional to genuinely beautiful. This guide covers the best wall panelling options for Australian bathrooms, what to watch out for in wet areas, and how to get the look you're after. Can You Use Wall Panels in a Bathroom? Yes — but the key is choosing the right product and installing it correctly. Bathrooms are wet areas, which means any wall panelling needs to be either naturally water-resistant or properly sealed and waterproofed before installation. The good news is that most natural stone panels — slate, marble, and sandstone — are entirely suitable for bathroom walls when installed with the right adhesive and grout system. Important: Always apply a waterproof membrane behind any wall panelling in wet zones (shower walls, areas within 1.5m of a bath). This is Australian building standard practice, not optional. Best Wall Panel Materials for Bathrooms Marble Wall Panels Marble is the classic choice for bathroom wall panelling — and for good reason. Its natural veining, cool smooth surface, and association with luxury make it the go-to material for high-end bathroom renovations. Sketch's marble wall panels come in thin stone veneer format, meaning they're lightweight enough to go directly onto plasterboard (with waterproof membrane) and don't require structural reinforcement. Popular applications: full-height shower walls, the wall behind a freestanding bath, vanity feature wall. Slate Wall Panels Slate brings a completely different energy to a bathroom — raw, textural, and grounded. It's particularly popular in contemporary and industrial-style bathrooms where the contrast between rough stone and polished chrome fixtures creates an interesting tension. Slate is naturally water-resistant and one of the most durable stone types for wet area use. Translucent Stone Panels For something genuinely unique, translucent stone panels backlit in a shower or behind a vanity create a spa-like glow that's hard to replicate with any other material. Sketch carries six translucent stone panel options, each with distinctive natural patterning. These are increasingly popular in high-end residential and boutique hotel fit-outs. Feature Wall Ideas for Bathrooms The Freestanding Bath Wall If you have a freestanding bath, the wall behind it is prime real estate for a statement material. A full run of marble wall panels — floor to ceiling, the width of the bath — creates the kind of bathroom you see in design magazines. Keep everything else simple: white plumbing, natural timber, minimal accessories. The Shower Feature Wall Rather than tiling every surface in the shower the same way, consider using stone wall panels on the main face wall only, with a complementary plain tile on the other three walls. This approach is more cost-effective than covering everything in stone and creates a clear focal point. The Vanity Splashback Even a small run of stone or marble panelling behind your vanity and mirror adds a level of finish that painted walls simply can't achieve. This is a low-cost, high-impact upgrade that can often be completed in a few hours. Half-Wall Panelling A classic approach in both traditional and contemporary bathrooms is to panel the lower half of the wall — typically to 1.2 or 1.5 metres — with stone panels, and paint or tile above it. This creates a clear visual break, is easier on the budget than floor-to-ceiling stone, and protects the most vulnerable section of wall from water splashing. Installation Tips for Bathroom Wall Panelling Always apply a waterproof tanking membrane in wet zones before panel installation Use a flexible tile adhesive rated for wet areas — standard adhesives can fail in humid environments Seal all grout joints with a penetrating stone sealer to prevent staining and mould For marble and light-coloured stone, use a light-coloured grout to avoid dark lines dominating the look Ensure adequate ventilation in the bathroom — good airflow extends the life of any wall finish How Much Does Bathroom Wall Panelling Cost? The material cost varies depending on the stone type. As a rough guide for Australian bathrooms: Slate wall panels: from $80–$130 per square metre Marble wall panels: from $120–$280 per square metre Translucent stone panels: from $200 per square metre A typical ensuite feature wall of 3–4 square metres would cost $300–$1,200 in materials depending on your stone choice. Full bathroom renovations using stone panelling across multiple walls are obviously larger investments, but the longevity and impact of natural stone make it a strong one. Browse Sketch's Bathroom Wall Panel Range Sketch stocks over 30 marble, slate, and specialty stone panels suitable for bathrooms and wet areas. We can help you choose the right product for your space, calculate quantities, and advise on the correct installation system. Order samples online or contact our team for personalised advice.
Learn all
Stone Cladding Suppliers & Natural Stone Veneer Manufacturers
Natural stone has always played a significant role in architecture. From historic monuments to modern luxury buildings, the timeless appeal of stone continues to influence design trends across residential and commercial construction. Today, stone cladding and natural stone veneer offer architects and builders a practical way to achieve the authentic beauty of stone while maintaining flexibility in installation and structural efficiency. Stone cladding involves applying natural stone to walls or structural surfaces, creating a protective and decorative layer that enhances both durability and aesthetic appeal. Meanwhile, natural stone veneer provides a lighter and thinner version of real stone, making it easier to install while maintaining the same authentic texture and character. Choosing reliable stone cladding suppliers and stone cladding manufacturers is essential for ensuring quality, durability, and consistent design results. Leading suppliers combine advanced manufacturing, high-quality stone sourcing, and innovative installation solutions. Companies like Sketch Australia specialize in modern stone cladding systems, offering lightweight natural stone veneer panels designed for architects, builders, and designers working on both residential and large-scale commercial projects. Your Trusted Stone Manufacturer Successful architectural projects begin with reliable manufacturers who understand natural materials and construction requirements. Experienced stone cladding manufacturers and stone veneer manufacturers combine advanced technology with expert craftsmanship to produce high-quality stone cladding materials. Modern manufacturing facilities are equipped with precision cutting tools and finishing technologies that transform natural stone into architectural panels and veneers. These processes ensure consistency in thickness, texture, and dimension while preserving the natural beauty of the stone. Many manufacturers also focus on developing innovative solutions that make stone easier to work with. For example, Sketch Australia has become known for producing thin and flexible natural stone sheets designed to meet modern architectural needs. These materials combine the authentic appearance of stone with lightweight construction, making them easier to transport, install, and integrate into complex designs. Another important factor when choosing stone cladding suppliers is their global distribution capability. Leading suppliers work with architects, builders, and construction companies worldwide, ensuring that high-quality natural stone products are delivered safely and efficiently. Secure packaging, international shipping experience, and technical support help ensure projects stay on schedule. Customization is also becoming increasingly important in modern architecture. Whether designing a residential feature wall or a commercial facade, professional stone veneer manufacturers offer a variety of textures, colors, and finishes to match specific design visions. Leading Stone Cladding Manufacturers for Modern Architecture Stone cladding has become one of the most popular design solutions for modern buildings. Architects often work with experienced stone cladding manufacturers and natural stone wall cladding manufacturers to incorporate natural materials into contemporary architectural styles. At its core, stone cladding is a protective outer layer of natural stone installed on structural walls. While it enhances aesthetics, it also improves durability by protecting the building structure from weather exposure and environmental damage. One of the biggest advantages of natural stone cladding is its exceptional durability. Natural stone forms over thousands of years under intense pressure, giving it a level of strength that few manufactured materials can match. Another key advantage is weather resistance. Natural stone cladding performs well in extreme conditions, including rain, sunlight, and temperature fluctuations. High-quality stone products are designed to maintain their appearance and structural integrity for decades. Aesthetic value is equally important. Each stone panel carries unique patterns, textures, and color variations that create visually striking surfaces. This natural variation adds depth and character to architectural designs. Modern stone manufacturers also focus on innovative materials that simplify installation. For instance, thin stone veneer panels developed by Sketch Australia are designed to provide the same visual appeal as traditional stone while being significantly lighter and easier to install. Natural Stone Wall Cladding Products Professional stone wall cladding suppliers typically offer a wide range of natural stone materials to suit different architectural styles. Some of the most widely used stone types include: Slate Quartzite Sandstone Limestone Granite Each stone type has its own unique characteristics. Slate provides bold textures and dramatic colors, while quartzite is known for its durability and resistance to weathering. Sandstone offers warm tones that complement natural landscapes, while limestone delivers a refined appearance ideal for interior spaces. Natural stone wall cladding is widely used in both interior and exterior applications. Interior Applications Inside buildings, natural stone panels are often used to create striking feature walls. Living rooms, hotel lobbies, and reception areas frequently incorporate stone cladding to create an elegant and welcoming environment. Fireplace surrounds are another popular interior application. Stone’s heat resistance and timeless appearance make it ideal for creating dramatic focal points in residential spaces. Exterior Applications Exterior stone cladding is commonly used for building facades, garden walls, and landscaping elements. These installations not only enhance visual appeal but also provide additional protection against environmental conditions. For example, modern thin stone panels such as those offered by Sketch Australia can be used on exterior facades while maintaining durability and reducing structural load. Stone Veneer Manufacturers and Suppliers While full stone blocks provide unmatched durability, many modern construction projects prefer stone veneer due to its lightweight structure and installation efficiency. Professional stone veneer manufacturers and stone veneer suppliers produce thin layers of natural stone that replicate the appearance of traditional stone masonry. These veneers are typically applied to walls using adhesives or mechanical systems. One of the primary benefits of stone veneer is its reduced weight. Traditional stone walls can place heavy loads on building structures, while veneer panels offer a similar appearance without requiring extensive structural reinforcement. Stone veneer also reduces installation time and labor costs. Because the panels are lighter and easier to handle, builders can install them more efficiently compared to traditional stone blocks. In modern design, stone veneer is commonly used for: Feature walls Building facades Commercial interiors Hotel lobbies Restaurant designs These applications allow architects to achieve the visual richness of stone without the structural limitations associated with full stone construction. Natural Stone Veneer Suppliers Reliable natural stone veneer suppliers play a crucial role in delivering high-quality materials for construction and design projects. Authentic natural stone veneer offers several advantages over artificial alternatives. First, natural stone veneer maintains the genuine texture and appearance of real stone. Each panel contains unique patterns formed through natural geological processes. Second, natural stone veneer is highly durable. The material can withstand environmental factors such as moisture, temperature changes, and UV exposure while maintaining its natural beauty. Finally, reputable suppliers focus on consistency in color and texture. This ensures that large architectural projects maintain a uniform appearance across all surfaces. Sketch Australia have gained recognition for producing 100% natural stone veneer sheets that combine authenticity with innovative lightweight technology. Natural Thin Stone Veneer Suppliers Among modern architectural materials, thin stone veneer has become one of the most popular solutions. Leading natural thin stone veneer suppliers and thin stone veneer suppliers produce stone panels that are significantly thinner than traditional stone slabs. Thin stone veneer typically ranges between approximately 1–4 mm in thickness depending on the manufacturing process. Despite its thin profile, the surface remains genuine natural stone. This reduced thickness offers several important advantages. First, it significantly lowers the weight of the material, making it easier to transport and install. Lightweight panels can also be installed on surfaces that may not support traditional stone. Second, thin stone veneer reduces transportation costs and installation time. Builders can complete projects faster while maintaining the aesthetic quality of natural stone. Finally, thin stone veneer allows architects to explore creative design possibilities. Flexible stone sheets can be installed on walls, furniture surfaces, and even curved architectural elements. Stone Cladding System Supplier A reliable stone cladding system supplier provides not only the stone panels but also the installation systems required to secure them safely. There are several common stone cladding installation methods: Mechanical Fixing Systems Mechanical fixing systems use brackets, anchors, or metal frames to attach stone panels to the building structure. This method is commonly used for large exterior facades. Adhesive Installation Adhesive systems attach stone panels directly to wall surfaces using specialized bonding materials. This method is commonly used for interior applications. Ventilated Facade Systems Ventilated facade systems create a gap between the building wall and the stone cladding. This gap allows airflow, reducing moisture buildup and improving energy efficiency. Modern thin stone products, including flexible veneer sheets, are often designed for adhesive-based installation, simplifying the construction process while maintaining durability. Important Factors to Consider When Choosing a Stone Cladding Supplier Choosing the right stone cladding suppliers involves evaluating several important factors. Quality of Natural Stone High-quality natural stone ensures durability and long-term performance. Reliable suppliers carefully source stone from trusted quarries. Manufacturing Capability Experienced stone cladding manufacturers use advanced machinery to produce precise panels and veneers. Product Variety A wide range of stone types, colors, and finishes allows architects to achieve unique design concepts. Shipping and Packaging International suppliers must provide safe packaging and efficient shipping to prevent damage during transportation. Certifications and Standards Suppliers who follow industry standards ensure that their products meet safety and performance requirements. Maintenance of Stone Cladding and Veneer Natural stone cladding is known for its durability and low maintenance requirements. However, proper care can help preserve its appearance and extend its lifespan. Regular cleaning with water and mild detergent removes dust and surface stains. Avoid harsh chemicals that may damage the natural stone surface. Sealing the stone periodically helps prevent moisture penetration and staining. Sealants create a protective barrier that maintains the stone’s natural finish. Proper drainage and ventilation are also important. Preventing excess moisture buildup helps maintain the structural integrity of the cladding system. When properly maintained, natural stone cladding can remain durable and visually appealing for many decades. After selecting a reliable supplier and the appropriate stone materials, the next step involves safe distribution and professional installation. Leading stone cladding suppliers provide global shipping services with secure packaging designed to protect stone panels during transportation. Crates and protective materials help ensure that products arrive safely at construction sites. Professional installation is equally important. Builders and contractors should follow recommended installation methods to ensure structural safety and long-term durability. Many suppliers also provide technical support and guidance for architects, designers, and construction teams to ensure successful project completion. Frequently Asked Questions What is the difference between stone cladding and stone veneer? Stone cladding refers to the application of natural stone panels to a wall surface, while stone veneer is a thinner layer of stone designed to replicate the look of full stone with reduced weight. Is natural thin stone veneer durable? Yes. High-quality thin stone veneer retains the durability of natural stone while offering a lighter and more flexible installation option. Can stone cladding be installed on existing walls? In many cases, stone cladding can be installed on existing walls using adhesive systems or mechanical fixing systems. How thick is natural stone veneer? Traditional natural stone veneer ranges between one and two inches thick, while modern flexible stone veneers may be only a few millimeters thick depending on the manufacturing process. How long does stone cladding last? With proper installation and maintenance, natural stone cladding can last for decades and often remains durable for the lifetime of the building.
Learn all
Blog posts
Blog post
Give your customers a summary of your blog post
Blog post
Give your customers a summary of your blog post
Blog post
Give your customers a summary of your blog post